
One day, on a visit to Sri Lanka in the 80's, my grandmother and I made a trip to town in a three-wheeler. After buying the spices and vegetables that she needed, grandmother took me to the sweet shop for a treat. I carefully weighed my options and then spent my saved rupees on some foil-wrapped toffees. You’d think I’d invested in golden bricks the way that I treasured them. When we got home, I gave everybody exactly one candy to cherish before I put the rest away for safekeeping. When I say safekeeping what I really mean is tied in a small baggie around my neck. That’s right. Just like some kind of candy-deprived maniac, I wore those toffees securely fastened around my little head. That’s how afraid I was that my precious sweets could be taken from me. Supposedly my mom has a picture of me fast asleep, candies safely secured at the end of a creepy string. Whoa. Whenever I hear this story, at the point at which I am the most ashamed of my ridiculous behavior, my sweet mom always chimes in with the fact that I did share them to begin with. As if that helps my case.
Are all kids candy hoarders or was that just me? Halloween candy got the same bizarre attention. In an effort to thwart any thievery, I kept a log of what candy I had and how many pieces of each remained. I was always happy to share but certifiably terrified that anyone might take an Almond Joy while I wasn’t looking. I must have been the security guard at a candy factory in my previous life.

The chocolate-covered coconut candies were my favorite and I had a special method for enjoying them. I would plant myself on the couch, legs folded up under my chin, with a wrapped Almond Joy tucked away in the crook of my knee. The candy stayed there, heating up, until it reached the perfect consistency – melty chocolate and soft, warm, heavenly coconut. (I wonder if I could jam a couple sticks of butter under my bent knees to soften them up in a pinch. I’ll get back to you.)

My tastes and cooking techniques have improved a bit over the years. Thank goodness. Now it’s time to bring back the Almond Joys and make them even tastier than the original. First up – toasted coconut. Toasting the coconut adds all those delicious roasty, caramel notes. Of course we want that. Get in there! Next a real vanilla bean for its glorious scent and richness. I admit it’s a splurge but a worthy one. As for binding, I’m sticking to coconut oil. It’s dreamy and I happen to have a giant jar of it in my cupboard. I recommend you get yourself a giant jar pronto. (Not too big, lest you find yourself asleep in there, lulled into a coconut stupor. It’s that good.) For sweetness, I used Lyle’s Golden Syrup because it reminds me of my dad. He loves the stuff. (I’ve seen him drizzle Lyle’s Golden Syrup over cooked white rice in a desperate attempt to satisfy his sweet tooth. Sugar ingenuity runs in the family.) I like it because its sweetness is a little more complex than something like corn syrup, but it doesn’t impart quite as much flavor as honey or maple syrup. It’s a satisfying, yummy middle ground.

Now let’s talk chocolate tempering. It’s fun and you’re going to love it! Tempered chocolate is the difference between having a shiny, snappy, chocolate coating that can stay solid at room temperature vs. something softer and meltier that’s better stored in the fridge. I learned how to temper chocolate back in culinary school but I’m no chocolate expert. Let’s let David Lebovitz hold our hand through this. David is down with pastry and I know we can trust him. (By the way, I read his book The Sweet Life in Paris this weekend. He really cracks me up. I’m pretty sure we should be friends.) So first things first – you should have a thermometer. Anna, one of the awesome pastry chefs I met at Daniel, could tell the temperature of melted chocolate by dabbing a dollop on her lip. Awe-inspiring. I’m not nearly as suave. A thermometer makes things dummy-proof. (Sometimes there are dummies in my kitchen.)

According to David, there are three easy steps to chocolate tempering. First, melt half of the chocolate in a heatproof bowl over barely simmering water to 115° to 120°F. Then take it off the heat, and stir the other half of the chocolate in, a little at a time, until the temperature drops to the low 80°F’s . Finally, gently bring the temperature back up, over that warm water, to between 88°F and 91°F. Boom. There you have it. Tempered chocolate. Not so scary at all! Three little steps and you're in candy town. Welcome!

Now you’re ready for the fun (ie. messy) part of the game – dipping the frozen candies in tempered chocolate. (Sing it: When I dip, you dip, we dip.) Be sure to keep the temperature of the chocolate between 88°F and 91°F. No sweat if you have to warm it up every once in a while. Just stir it frequently and don’t let it go above 91°F (otherwise you must start over with the whole heating and cooling business).

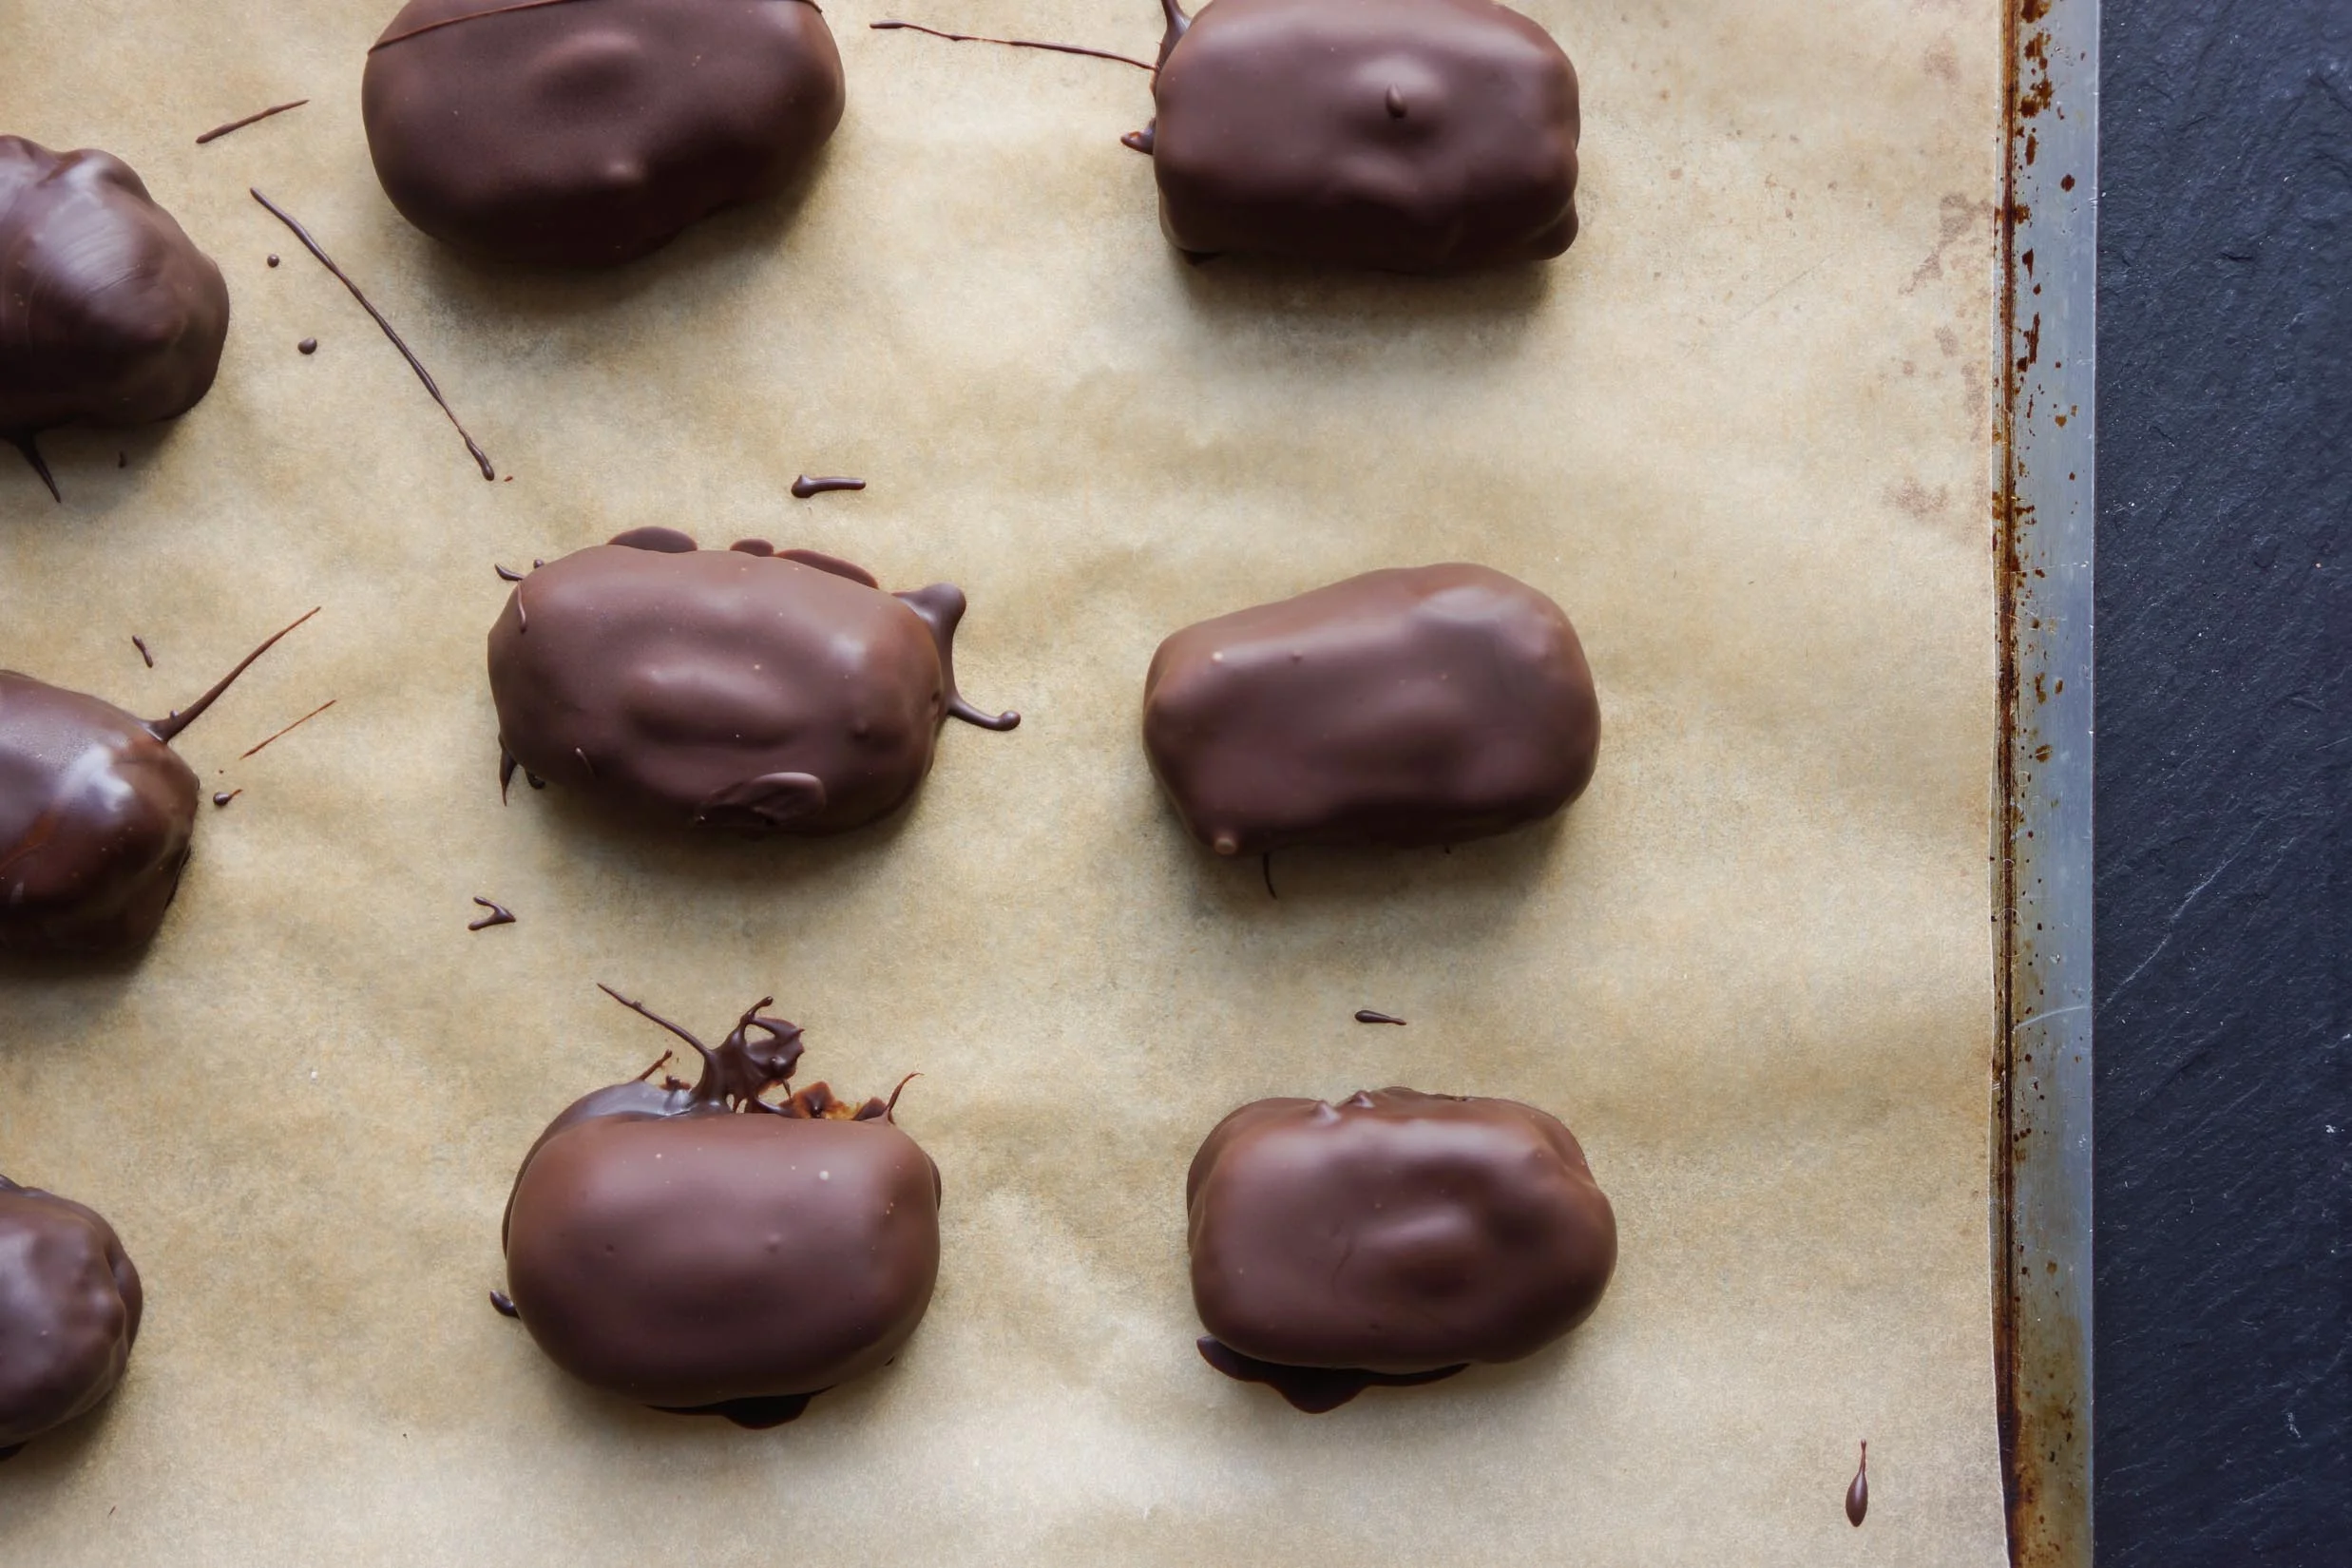
Check out these cute little chocolate buddies! My tempering job wasn’t perfect. Technically all those little streakies are bad. But I have some really good news about chocolate – no one cares if it isn't perfect. Unless you’re a professional chocolatier, a streaky chocolate is still a fabulous one. I think the variations are kind of fetching, no? Rustic. Charming. Homemade goodness.
I’ve got more good news! If you’d rather just say, “tempering schmempering,” you’re in luck. Just melt some chocolate (heck, use the microwave!), dip your candies in there, and then pop them in the fridge to harden. Take them out of the fridge for a little while before you scarf them down. Done. The chocolates will be a little softer and meltier in your hands but they will still be perfectly fantastic. With this method, you can keep your bent knees free for warming up other things.

Homemade Almond Joy
Makes 16 to 32 (depending on how big you’d like your candies – 2 bites or 1)
Thanks to Food52 for a little recipe help on this one. My toasted coconut mixture wouldn’t hold together on my first attempt and I wasn’t interested in adding more sweetener or fat once I liked the flavor. A quick internet search brought me to an Almond Joy recipe on their site which ground the coconut mixture in a food processor to help it bind. Genius! I employed the same technique on mine and they worked beautifully. Gracias.
This recipe calls for quite a bit of extra chocolate. It’s easier to temper if you work with at least a pound or more. Any extra chocolate can be saved and used again. If you’re going the melted chocolate/ fridge route, you only need 12 ounces.
For the candies:
3 1/2 cups unsweetended shredded coconut (about 8 ounces)
1/4 cup coconut oil
1 vanilla bean, split and seeds scraped
5 tablespoons Lyle’s Golden Syrup
1/4 teaspoon coarse salt
16 to 32 roasted salted almonds
For the chocolate coating:
1 1/2 pounds bittersweet chocolate (70%), chopped
1. Make the candies: In a large skillet, toast coconut over medium until golden brown, stirring constantly, about 8 minutes. (It’s ok if the coconut is not completely evenly brown.) Transfer to the bowl of a food processor.
2. To the skillet, add coconut oil and vanilla bean seeds and warm over low, about 1 to 2 minutes. Scrape coconut oil mixture into the bowl of the food processor. Add golden syrup and salt to coconut mixture. Process until a chunky paste forms. The mixture needs to hold together so stop the processor and test it until you get to a texture that works. Transfer mixture to a bowl.
3. Line a cookie sheet or a plate (depending on how much room you have in your freezer) with parchment. Using your hands (I would recommend investing in a box of disposable rubber gloves to keep the food clean. You’ll thank me next time you have to devein shrimp.) shape the mixture into 1 1/2 inch by 1 inch rectangles and set on prepared sheet. Press one or two almonds into each rectangle, taking care to reshape the mound if necessary. Transfer the sheet to the freezer and freeze until candies are very firm, at least 30 minutes.
4. Meanwhile, temper the chocolate: Transfer half of the chocolate to a large bowl set of a pot of barely simmering water. Melt the chocolate, stirring occasionally. The chocolate should be 115°-120° degrees. Transfer bowl to your workspace and wipe the bottom dry.
5. Now add the remaining chocolate, a little bit at a time, stirring, until the temperature goes down to the low 80°’s.
6. Pop the chocolate back over the heat and carefully bring it up to between 88° and 91°. Remove from heat and wipe the bowl dry again.
7. Carefully drop one candy into the tempered chocolate and flip it around with two forks. Lift the candy out and tap it against the side of the bowl to remove excess chocolate, and transfer it to the parchment-lined sheet. Repeat with remaining candies. If the temperature of the chocolate falls below 88° just rewarm it. If it goes above 91° start the process over again. (When you are all finished, the extra chocolate can be cooled, wrapped in plastic, and used again. Don’t let anything go to waste!)
8. Let the candies harden and enjoy. They can be kept at room temperature in an airtight container.